Posts

Finally the BATHROOM

Image
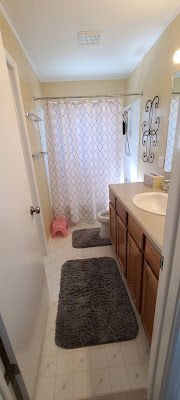
We have slowly been remolding our starter home for the last 12+ years. I think this bathroom might be the last room in the house besides a few little things. This room has been a long time waiting for some loving. Linoleum floor, old vanity, off centered toilet, stained tile and bathtub, out of date sink and light fixtures. Not to mention how slowly things keep breaking. The floor was pealing, cupboard cracked, vent never stayed on, toilet moved around, and towel racks were way loose. You think it was over due!? We picked a Saturday way later in the summer then we wanted. We were to busy playing with kids, doing all the things that are fun in the summer. We finally took the leap for demolition day. We wanted to take out the whole bathroom in one day. As we realized that we would be down to one bathroom we decided to do it in sections. Taking out the shower tile was by far the worst job. If we had any angry built up this was a great way to get it out. Swinging hammers at tile as hard as

Trailer Reno

Image
Outside Face Lift  We decided it wasn't enough to just remodel the inside but now the outside needed some help. We saw someone who spray painted the outside of their pop-up and liked the way it looked, so now we had to do it as well. We started by having to take the pre-existing vinyl off. That was a stubborn job! We first tried using a heat gun. We hoped it would just peal off but it was proving really difficult. We ended up buying a rubber wheel that attached to our drill and it came off really nicely. Deciding on a color was a lot harder then we thought. We took a bold move and spray painted the trailer light blue. I don't know what we were thinking! Not only did it look splotchy but the blue was definitely not the right color. (Sorry, it didn't even deserve a picture.) We landed on a  bronze  which goes so nicely with nature. Reminds me of all the trees. That wasn't the end of the paint frustration. Spray painting is tricky and it keep looking splotchy with every c

Trailer Reno

Image
The Floor Now that the ceiling is finally completed we can move on to more fun parts. Putting in the floor! We used a vinyl floor from Home Depot.  Vinyl Sheet flooring  It was easy to install, very durable, water proof, and light weight. It went in with no hiccups unlike the ceiling and roof. THEN... The walls we put up the walls using  Vinyl Reversible Panel . Sean-Paul put up the paneling with a little glue and some staples depending on where the paneling was placed. THEN... The Benches  Next, onto the benches. We had to rebuild them. They were just to old, didn't feel sturdy and the wood smelled like smoke. Sean-Paul had a creative idea to add more sleeping space, since we have four kids. He took the long bench, attached hinges and legs. Cushions had Velcro sewn on to keep them together while sleeping. It is a prefect size for a kid! Our one regret is we should of made two long cushions instead of one long, a short, and medium.  The reason we made the cushions like that is we w

Trailer Reno

Image
The Roof This roof has thrown us a curve ball.  A leaky roof! That was one thing we were trying to avoid when purchasing a trailer and now our project is much bigger then we wanted. This is the promise of DIY projects. I would love to here the story of a DIY project that went so smoothly, it ended up being less work then anticipated. We pulled all the rotted wood down and took out most of the metal trim around the roof. Sean-Paul put in some new wood to help it hold. To make sure it would never leak again we painted the roof with a  silicone coating . We will never have a leak problem again! Now we move on to the inside. Making the ceiling pretty! We decided to use a plastic  panel  on the ceiling. I love it! It is super durable cleans up great. It's a lot heavier then wall paper, so if you are worried about adding more weight it might not be the way to go.  We had to take some of the bolting out from the metal trim. We

Trailer Reno

Image
GUT IT Gut the whole thing! Take everything out except for the good stable bones. This is always my least favorite day of any project we ever do. It always reveals more then we bargained for. It leaves me frustrated and overwhelmed. Luckily, I have a husband whom feels super motivated at this point and knows how to put stuff back together better then it was before. If he doesn't know, he learns! Don't ask me how but he learns and I love it. It is a super lovable trait about him. Have to say I questioned the roof when we bought our 1986 trailer but I shut my mouth as we made the purchased. Of course, as always, I was right! We unscrewed the light to see how we could get a plastic panel on the roof to cover up the wallpapered ceiling. Water came out of the rusted screw hole. Ah! Yes...the rippled wallpaper revealed leaks and wet wood. Not what we wanted to deal with at all! I said to Sean-Paul, "I am having buyers remorse." He saw the loo

Trailer Reno

Image
TRAILER PURCHASE So, here we are stuck in the middle of a pandemic. In our minds we have all this extra time because everything is cancelled. We are home bound and need a project, something to do with the family that won't make us sick with COVID 19. A new ??? camper... It doesn't look to bad from the outside, right. Old but in pretty good condition, so we think. $1600.00 is what we paid. The bones are good, no leaks, lights work, heater works, water, outside hose, and stove. This is what we were told anyway. Now look at the inside. Okay, it needs some help! This is what we like to do.Take something old and make it new. It is gonna be a fun week. (I say week because that is our time frame goal.) We want to go camping! I personally think it is very ambitious but we'll see. new curtains   new paneling new cushions new counter top new faucet extra bed addition new bedding and mattress toppers new floors paint cabinets and table add storage add aw