We have slowly been remolding our starter home for the last 12+ years. I think this bathroom might be the last room in the house besides a few little things. This room has been a long time waiting for some loving.
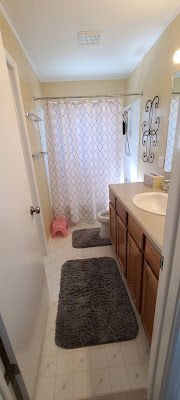
Linoleum floor, old vanity, off centered toilet, stained tile and bathtub, out of date sink and light fixtures. Not to mention how slowly things keep breaking. The floor was pealing, cupboard cracked, vent never stayed on, toilet moved around, and towel racks were way loose. You think it was over due!?
We picked a Saturday way later in the summer then we wanted. We were to busy playing with kids, doing all the things that are fun in the summer. We finally took the leap for demolition day.
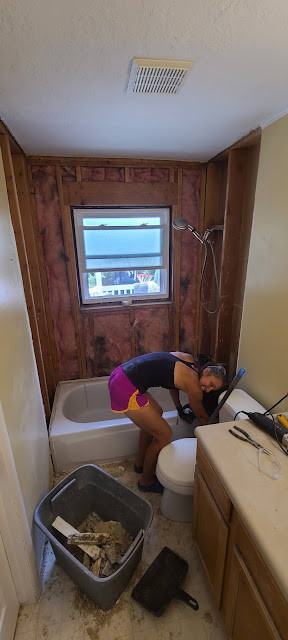
We wanted to take out the whole bathroom in one day. As we realized that we would be down to one bathroom we decided to do it in sections. Taking out the shower tile was by far the worst job. If we had any angry built up this was a great way to get it out. Swinging hammers at tile as hard as you could all day. What a mess!
Get the bathtub out was next. So grateful it wasn't glued down and that it wasn't made of heavy porcelain. We were nervous about that but it turned out to be pretty light.
We were hoping to get this point (see picture above) a day after demo but it took more like a week when you add in work, family, and life that you just can't put on hold.
Here is our question: (please put you answer or opinion in the comments) Why tile the shower 3/4 way up the wall? This is our second bathroom remodel and we tile all the way to the ceiling. A couple reasons:
- It makes the shower area look bigger and better.
- It protects drywall from water damage.
- No drywall finishing!
By this point it had been a week and we realized our 2 week deadline was not gonna happen. I absolutely hate living in construction. It gives me super high anxiety and yet we keep doing it. CRAZY!
Now onto the tile project. That was the biggest longest part of the bathroom. It took us days to finish. In the picture above you can see red circular spacers we used. In our previous bathroom project we've used the little white x's to space the tile. Then we discovered the Spin Doctor! (We bought them at our local tile store.) They are amazing and also help with levelling the tile. Definitely worth a little bit more money because they make your job so much easier. After the cement is dry you spin the red piece off and take rubber mallet and knock the black piece off.
 |
| Finally Finished! |
Well, now we need to grout but that is easy compared to tiling. I am proud to say that I know how to use a wet saw and tile now. Not sure if I will ever do it again but I learned.
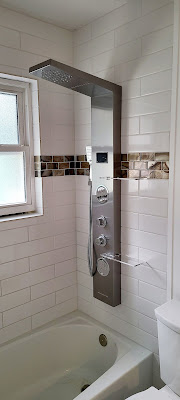
We used long white subway tiles with an accent glass tile. Tile spacing is 1/8".
Now my husband gets to figure out how to move the toilet over 6" so we can have a bigger vanity and even space between the toilet and tub. FUN!
A little water damage on the floor but that didn't surprise us. We just replaced the boards. The floor needed to be leveled out for tile anyway. He ended up getting a few different shaped pipes so he could move the toilet over. If you have ever been in the plumbing aisle at Home Depot there are so many different shapes and sizes of plumbing pipes to choose from. Just be sure it fits exactly because a leak in the plumbing for your toilet would really suck!
What a difference grout makes! We went with a white color. We originally bought epoxy grout and after reading the directions and watching YouTube videos decided to go back to the other. Once it is mixed you have less then 30 minutes to get it in the cracks and cleaned up. We watched a video of one guy that had to rip out his tile because he messed the epoxy grout up. It defiantly is more durable and stain resistance but if you are new to applying it I wouldn't take the risk.
Finished with the tile is an exciting stage because it is the hardest and biggest part of the bathroom project.
My "can do anything" husband prepared the plumbing for two sinks!

Meanwhile Cosette and I attempted to put together the barn door. We ended up needed Sean-Paul's help for that as well.
Installed toilet and shower panel. Deciding on a toilet was limited because we didn't leave ourselves a lot of room. It was between any toilet that was in stock and had a small back.
Shower panel is AMAZING! I love how it lights up and tells you the water temperature. It even tells you how long you have been showering for! Second question: (answer in the comments) Why would you not buy a shower panel?
- They give you way more of a WOW feature.
- The shower is way more fun!
- It is easier to install. Two hoses that is it and one hole in the tile.
I don't have a installation picture but we ended up putting a wall
panel on the wall behind the vanity. It saved us a lot of work from patching up holes to converting one light fixture to two and doing a lot of putty work from the old vanity. I think it turned out great, you'll see.
Not much more to do other then finishing touches. Painting, caulking, trim pieces, cutting baseboards to fit vanity in, hanging lights and mirrors....WALLAH!
We put in these great little metal corner shelves in the shower for storage plus the shelves that came with the shower panel. Now everything has a home!
The barn door was defiantly custom work! There was a lot of tweaking so that it slid right with out dragging across the door trim. We also had to buy more floor guiders so it could stop further on the wall. This allows use to use our light switch. (not shown in picture) Even though we bought a kit it didn't come with door handles. We bought very simple ones. We couldn't have anything sticking out on the bathroom side or it wouldn't close.
Still to come is a lock for the door...

Thanks for reading! It took us about 4 weeks from start to finish with all our work and jobs along with it. If you are thinking about remolding your bathroom I hope this post helps!


 Meanwhile Cosette and I attempted to put together the barn door. We ended up needed Sean-Paul's help for that as well.


Great write up Jen. Love the sinks cupboards everything looks great. Enjoy your new bathroom.👏😊
ReplyDelete